Wednesday 14 May 2014

What You'll NeedP An always-on computer: This is the computer you're going to securely tunnel your traffic through when you're browsing from outside your home network.P Hamachi: A free (for non-commercial use), cross-platform VPN service that, simply put, gives you secure access to your home network no matter where you are.P Privoxy: A free, easy to set up web proxy with advanced privacy features.P P Step One: Install and Set Up HamachiP The first thing you'll want to do is install Hamachi on the computer that's going to act as you proxy and on the computer(s) you want to browse securely on when you're on a public network. For example, I've got Hamachi installed on my Windows desktop computer at home (which will act as my secure proxy), then also installed on my MacBook Air (which I'll be using on public networks).P How to Secure and Encrypt Your Web Browsing on Public Networks (with Hamachi and Privoxy) Once you've installed and powered on Hamachi (the first time you launch it, you need to click to blue power button to "Power on"), you'll need to create a new private network. To do so, click the Network menu, then select Create a new network. Give your network a unique ID and password (remember the password), then click Create. That's all there is to setting up your new network.P How to Secure and Encrypt Your Web Browsing on Public Networks (with Hamachi and Privoxy) Next, download and install Hamachi on your laptop or other machine. Again, power on Hamachi, but this time, instead of creating a new network, select Network > Join an existing network, and then enter the Network ID and password you set up on the first machine.P Note: You can also create and manage your networks by signing into LogMeIn. For our purposes it's not necessary, but it is a great way to further manage Hamachi. You can rinse and repeat this on every machine you want to do this with, for up to 16 clients (that's the limit for Hamachi's free-for-non-commercial-use version). Now that you're set up with Hamachi, it's time to install Privoxy on your always-on home machine.P Step 2: Install and Set Up PrivoxyP Privoxy is a free, open source web proxy that we're going to install to your always-on home machine. So download Privoxy from Sourceforge for your system and install. Privoxy is available for Windows, Mac, and Linux, so you should be able to find a download to fit your needs. For my example, I'm using Windows, which you can easily install by running through a regular old installer. Things may run slightly different on other systems, but it should be the same basic setup. If you need help, check Privoxy's installation page.P After you've installed Privoxy, launch the application. (If you're running a firewall, you may need to give it access to open a port.) In Windows, Privoxy loads as a blank window. Don't worry, that doesn't mean it isn't working. In fact, you can close this window; Privoxy will still be running in your system tray.P How to Secure and Encrypt Your Web Browsing on Public Networks (with Hamachi and Privoxy) Now it's time to configure Privoxy to shuttle traffic through your Hamachi setup, so right-click Privoxy in the system tray and select Edit > Main Configuration. Notepad will open with a text file called config.txt; this is Privoxy's main configuration file. Press Ctrl+f and search for listen-address 127.0.0.1:8118. Comment out that code by entering # in front of it, then paste listen-address followed by the IP address created by Hamachi. You can see, for example, that my proxy is set to listen-address 5.xxx.xxx.xx:8118. Save config.txt and restart Privoxy.P Step 3: Set Up Your Web Browser to Use Your New Secure ProxyP Now you just need to set your browser to use the secure Hamachi+Privoxy proxy you've set up so far. This last step varies by browser, but I'll walk through setting it up on Chrome or Firefox.P On ChromeP How to Secure and Encrypt Your Web Browsing on Public Networks (with Hamachi and Privoxy) SEXPAND Install the Proxy Switchy extension. Once installed, it should automatically open a new tab with its options. (If it doesn't, right-click the Proxy Switchy icon in your toolbar and select Options.) Enter a profile name—something like Privoxy. In the HTTP Proxy box under Manual Configuration, enter the Hamachi VPN IP address to the computer where you set up your proxy. Set the port to 8118. (Remember that you need Hamachi running on both computers when you want to use this proxy, and you can get the IP of any other computer on your Hamachi network by right-clicking the computer name and selecting Copy address.) Click Save and you're done. Whenever you want to browse using your secure proxy—whenever you hit your coffee shop, for example—just click the Proxy Switchy icon in Chrome, then select your Privoxy connection. On FirefoxP How to Secure and Encrypt Your Web Browsing on Public Networks (with Hamachi and Privoxy) SEXPAND Open your Firefox preferences, then click on the Advanced tab. Click the Network tab, then the Settings button next to "Configure how Firefox connects to the Internet". Click Manual proxy configuration, then enter the IP address of your Hamachi-powered proxy server and 8118 as your port. (In my case, for example, I'd right click "Windows" in Hamachi and copy the address for the Windows computer.) Click OK. Make Sure It's WorkingP To test that Privoxy is working, you can simply point your browser to http://config.privoxy.org/. If it is, you'll see a message like "This is Privoxy 3.0.17 on Windows (5.xxx.xxx.xx), port 8118, enabled." If not, you'll see a page that reads "Privoxy is not being used". Also, if you're on a public Wi-Fi connection and you navigate to something like WhatIsMyIP.com with your proxy turned off, you should see a different IP when you reload the page with your proxy turned on. (Essentially, when turned on, your home's public IP address should be showing.)P And that's all there is to it. This may sound a touch geeky or complicated, but it's an extremely useful thing to have set up, and it's actually really easy to set up and use. And remember, even though your proxy is running over an HTTP connection, Hamachi is encrypting everything that runs between your computers, so it's still a secure option. Also keep in mind: This is far from the only way to accomplish this task. You could, for example, set up an SSH SOCKS proxy to encrypt your browsing. I like this method because it's relatively simple to set up, and so far, it's worked like a charm for me. If you've got your own favorite alternative, let's hear about it in the comments.

How Do You Keep Your Email Address Private?
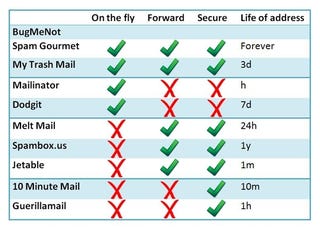
Reader Jonathan sent us this snazzy graph he made comparing different disposable email services, which got us wondering: What do you use to keep your primary email address out of the public (and spammer's) eye?P
Whether you're signing up for a free site that requires a login or the last web newsletter without an RSS feed, handing out your primary email address willy nilly isn't an option for most tech-savvy folk. We've featured many different temporary email services, and each one has its own set of pros and cons—as you can see in the chart above. Deciding which one to use depends on how important each feature is to you.
What features do you look for when choosing a method for email anonymity? If you haven't found the perfect solution, what's missing from the current offerings? Let's hear how you keep your email to yourself in the comments.

No comments:

Post a Comment